
259 lines
20 KiB
Markdown
259 lines
20 KiB
Markdown
---
|
||
source_url: "https://fluxsec.red/reverse-engineering-windows-11-kernel"
|
||
ingested: 2026-07-02
|
||
sha256: 8c81529b6380de12393a6b221e1f3dd7a16fdd14c83eb1fcfa3a51721e66bc24
|
||
discovered_from:
|
||
platform: discord
|
||
channel_id: "1028287639918497822"
|
||
channel_name: "chat"
|
||
message_id: "1522212934732873820"
|
||
author_id: "890908900520505354"
|
||
posted_at: "2026-07-02T12:10:44.989000000Z"
|
||
message_excerpt: "https://fluxsec.red/reverse-engineering-windows-11-kernel"
|
||
---
|
||
## Reverse engineering undocumented Windows Kernel features to work with the EDR
|
||
|
||
Reverse engineering Windows internals: because sometimes the best way to fix a problem is to take the operating system apart.
|
||
|
||
---
|
||
|
||
## Intro
|
||
|
||
The information contained in this blog post is valid for the Windows 11 Kernel 24H2, and is not guaranteed to be accurate on other kernel versions.
|
||
|
||
The code for this can be found on GitHub: [Sanctum](https://github.com/0xflux/Sanctum). If you like this, please show support by giving it a star, it keeps me motivated!
|
||
|
||
So; in a [previous post](https://fluxsec.red/event-tracing-for-windows-threat-intelligence-rust-consumer) I’ve talked about reading the **Event Tracing for Windows: Threat Intelligence** provider (ETW:TI), which gives us access to telemetry signals from the Windows kernel.
|
||
|
||
So, on a somewhat productive Sunday I have gone to tackle the ETW:TI signal indicating a remote process memory write has happened ([source code](https://github.com/0xflux/Sanctum/blob/main/sanctum_ppl_runner/src/tracing.rs)).
|
||
|
||
This will be easy I thought. We have the bitflag for writing remote memory:
|
||
|
||
```rust
|
||
const KERNEL_THREATINT_KEYWORD_WRITEVM_REMOTE: u64 = 0x80000;
|
||
```
|
||
|
||
So, all we need to do is logical AND that mask and we win right? Right?
|
||
|
||
Well. No.
|
||
|
||
After hours of angry debugging (aka throwing prints everywhere, in both kernel mode and user mode) I gave up this approach, had a small cry, and came back to it with a new strategy - **reversing the Windows 11 kernel**.
|
||
|
||
## Intro to reverse engineering the kernel
|
||
|
||
So; reversing the kernel (or more specifically, the Executive) sounds like a daunting process, but its no different really to reversing an ordinary process, except for the fact there’s less documentation online on functions, meaning a little more legwork. There are a few other concepts to know about, but nothing that makes the bar to entry super high if you are already writing drivers / debugging drivers / reversing usermode programs.
|
||
|
||
One big difference is that the **GS** segment does not point to the [TEB](https://www.vergiliusproject.com/kernels/x64/windows-11/24h2/_TEB) but instead the [KPCR](https://www.vergiliusproject.com/kernels/x64/windows-11/24h2/_KPCR). The GS segment is relevant for what we are looking at today.
|
||
|
||
The **KPCR** is the Kernel Processor Control Region, which is kept for each logical processor and contains information about the processor. I’d recommend spending some time on [vergiliusproject](https://www.vergiliusproject.com/kernels/x64/windows-11/24h2/_KPCR) looking through the KPCR structure, as it contains a lot of information which is used to track state.
|
||
|
||
Two structs that are worth knowing, are the [EPROCESS](https://www.vergiliusproject.com/kernels/x64/windows-11/24h2/_EPROCESS) and [KPROCESS](https://www.vergiliusproject.com/kernels/x64/windows-11/24h2/_KPROCESS). In short, the EPROCESS is the ‘executive’ structure of a process on Windows, containing information that is relevant to the higher level parts of the Windows kernel. Whereas KPROCESS contains information relevant to the lower level components of the kernel, such as the for scheduler. Notably, `KPROCESS` is embedded in the `EPROCESS` at offset 0x0.
|
||
|
||
I haven’t yet written a blog post on this yet; but one thing that you may spot now you know about the above types; in a pre-operation callback routine for a new process starting, the first parameter is a pointer to the `EPROCESS`, something which itself will be relevant later.
|
||
|
||
## Reverse engineering NtWriteVirtualMemory
|
||
|
||
Okay so, our current problem is that we expect the **KERNEL\_THREATINT\_KEYWORD\_WRITEVM\_REMOTE** mask to match when our ‘malware’ writes memory into a remote process (done via [WriteProcessMemory](https://learn.microsoft.com/en-us/windows/win32/api/memoryapi/nf-memoryapi-writeprocessmemory)).
|
||
|
||
My current favourite reverse engineering tool of choice is [Binary Ninja](https://binary.ninja/), I love their interface and colours, and I find it easier to navigate than IDA, Ghidra etc. So, where do we start with reversing the kernel? With the kernel image! In **C:\\Windows\\System32** you will find `ntoskrnl.exe`, this is the kernel!
|
||
|
||

|
||
|
||
We can crack this open in a disassembler of your choice, I’ll be using Binary Ninja. To give an overview of the interface:
|
||
|
||
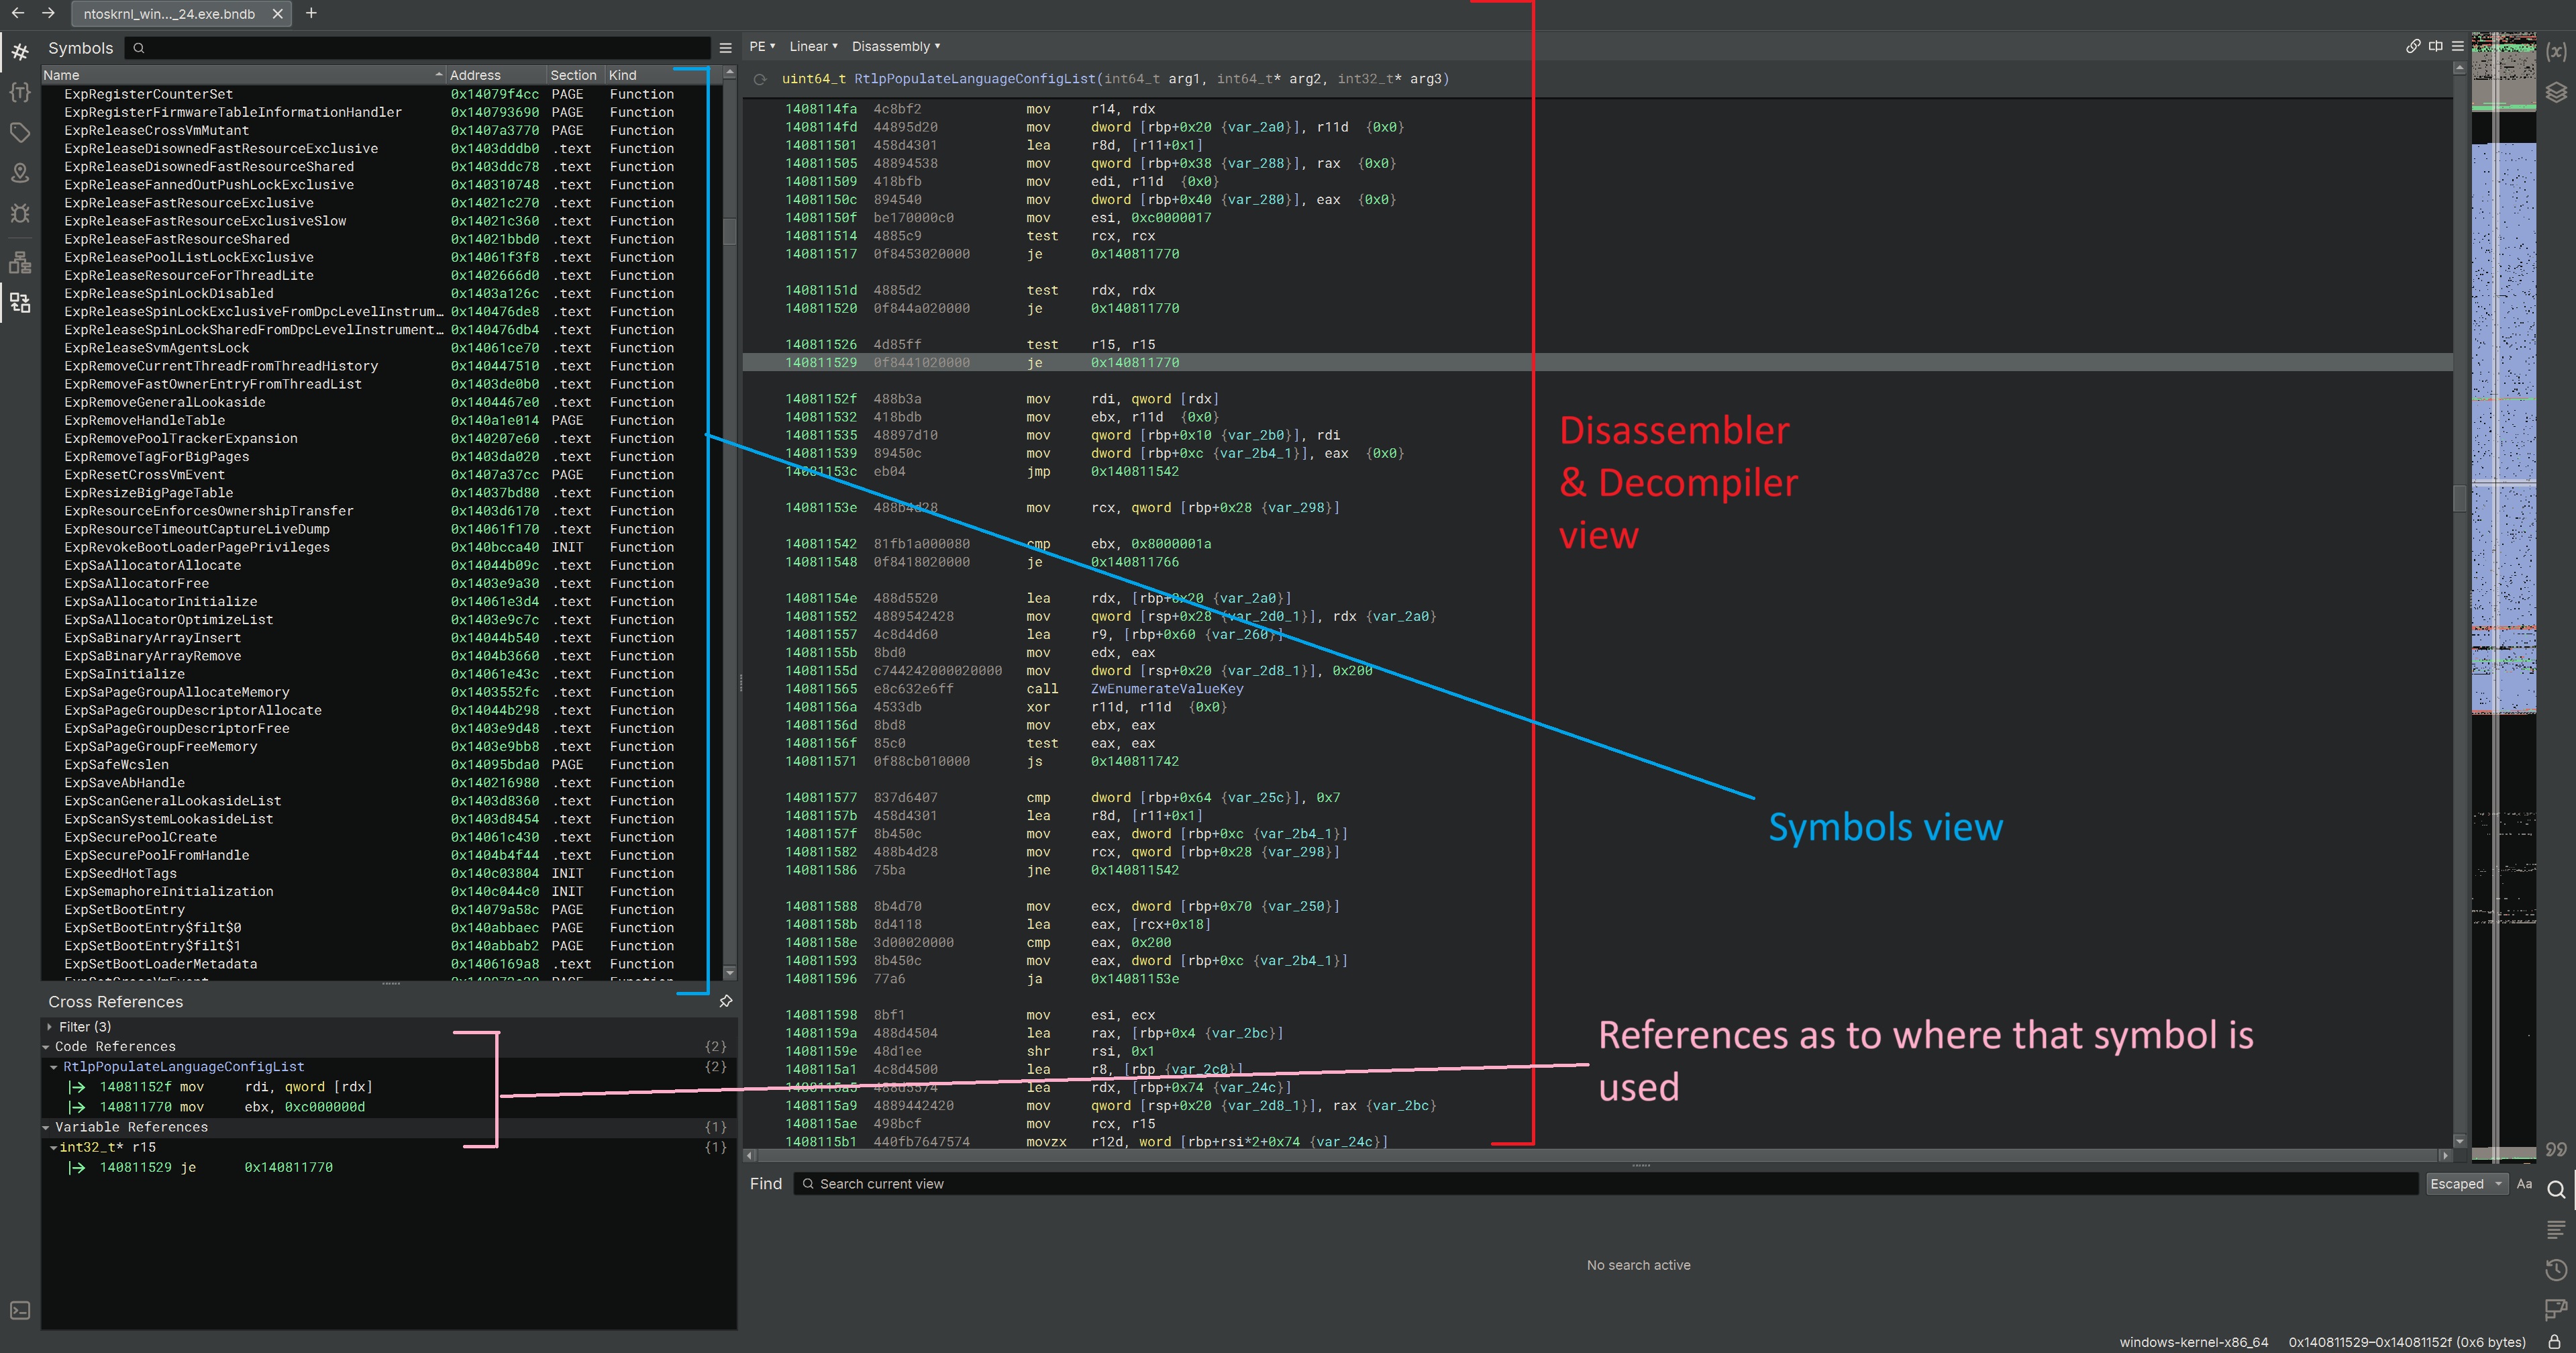
|
||
|
||
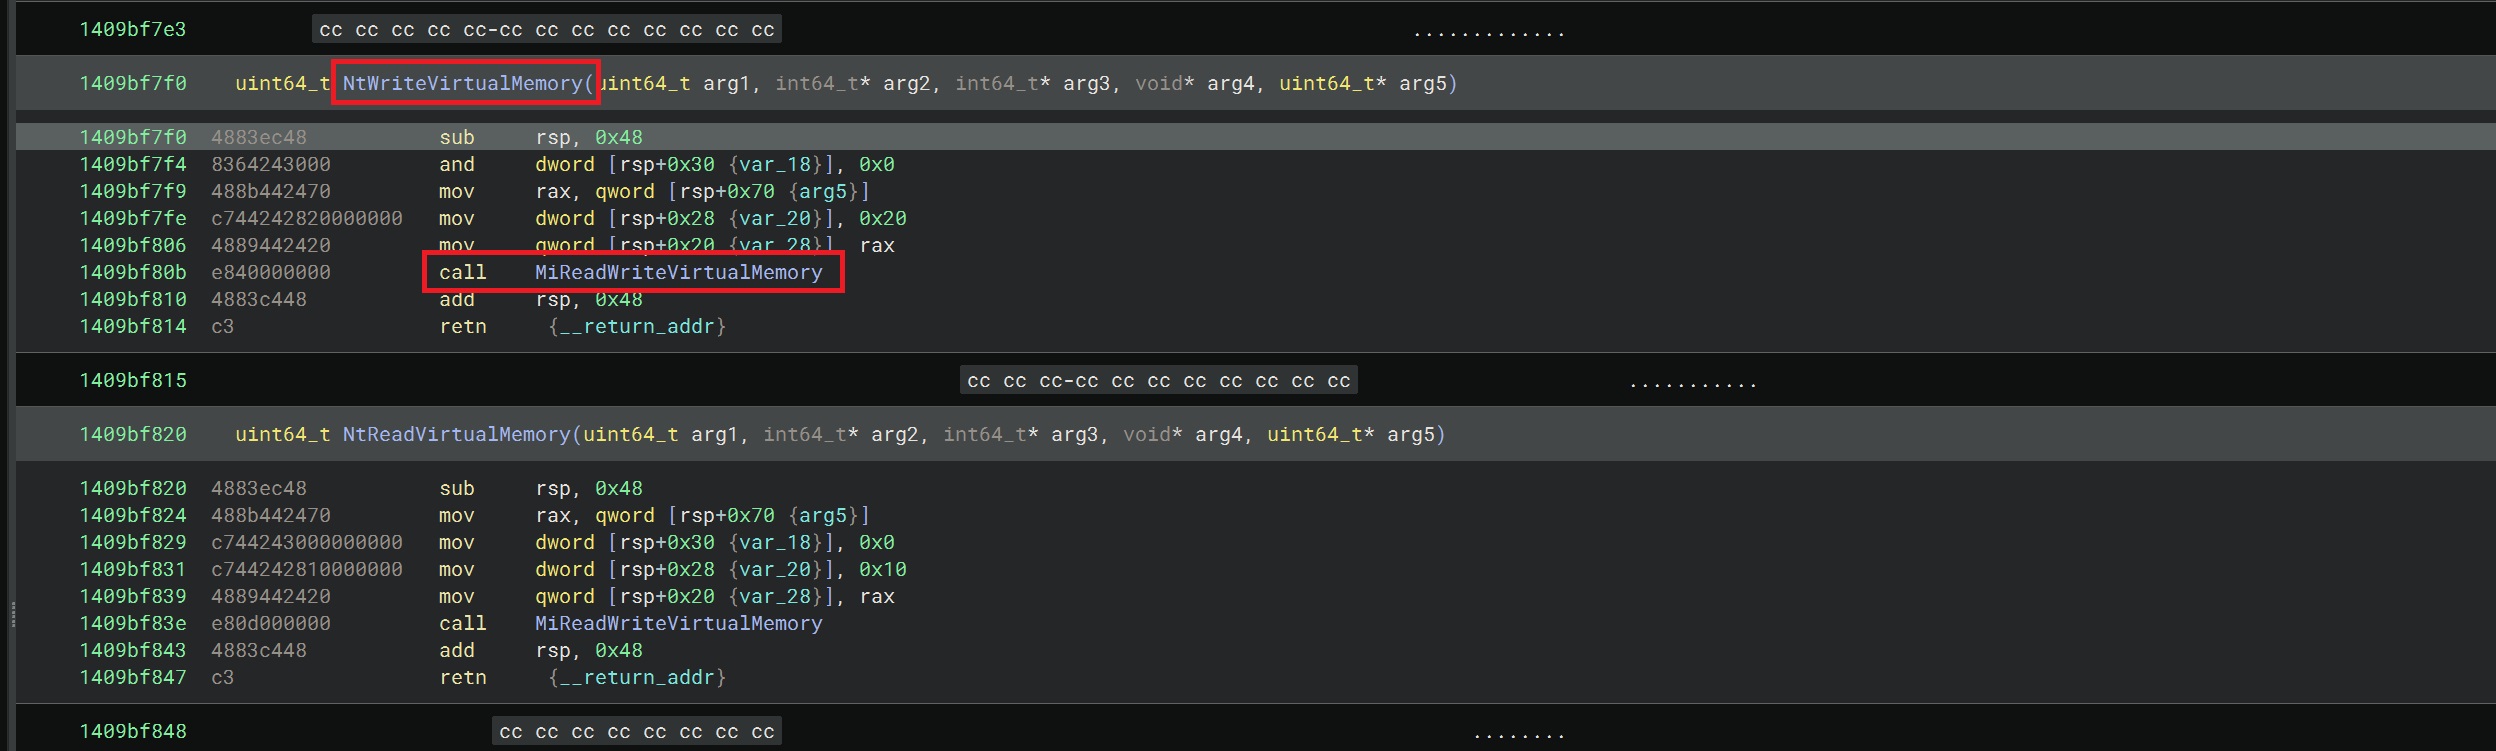
The very first thing we want to do, is have a look at how the kernel is implementing `NtWriteVirtualMemory`, which is the function that performs memory writes when called from usermode via `WriteProcessMemory`. We can look this function up in the symbols table in the left pane:
|
||
|
||
|
||
|
||
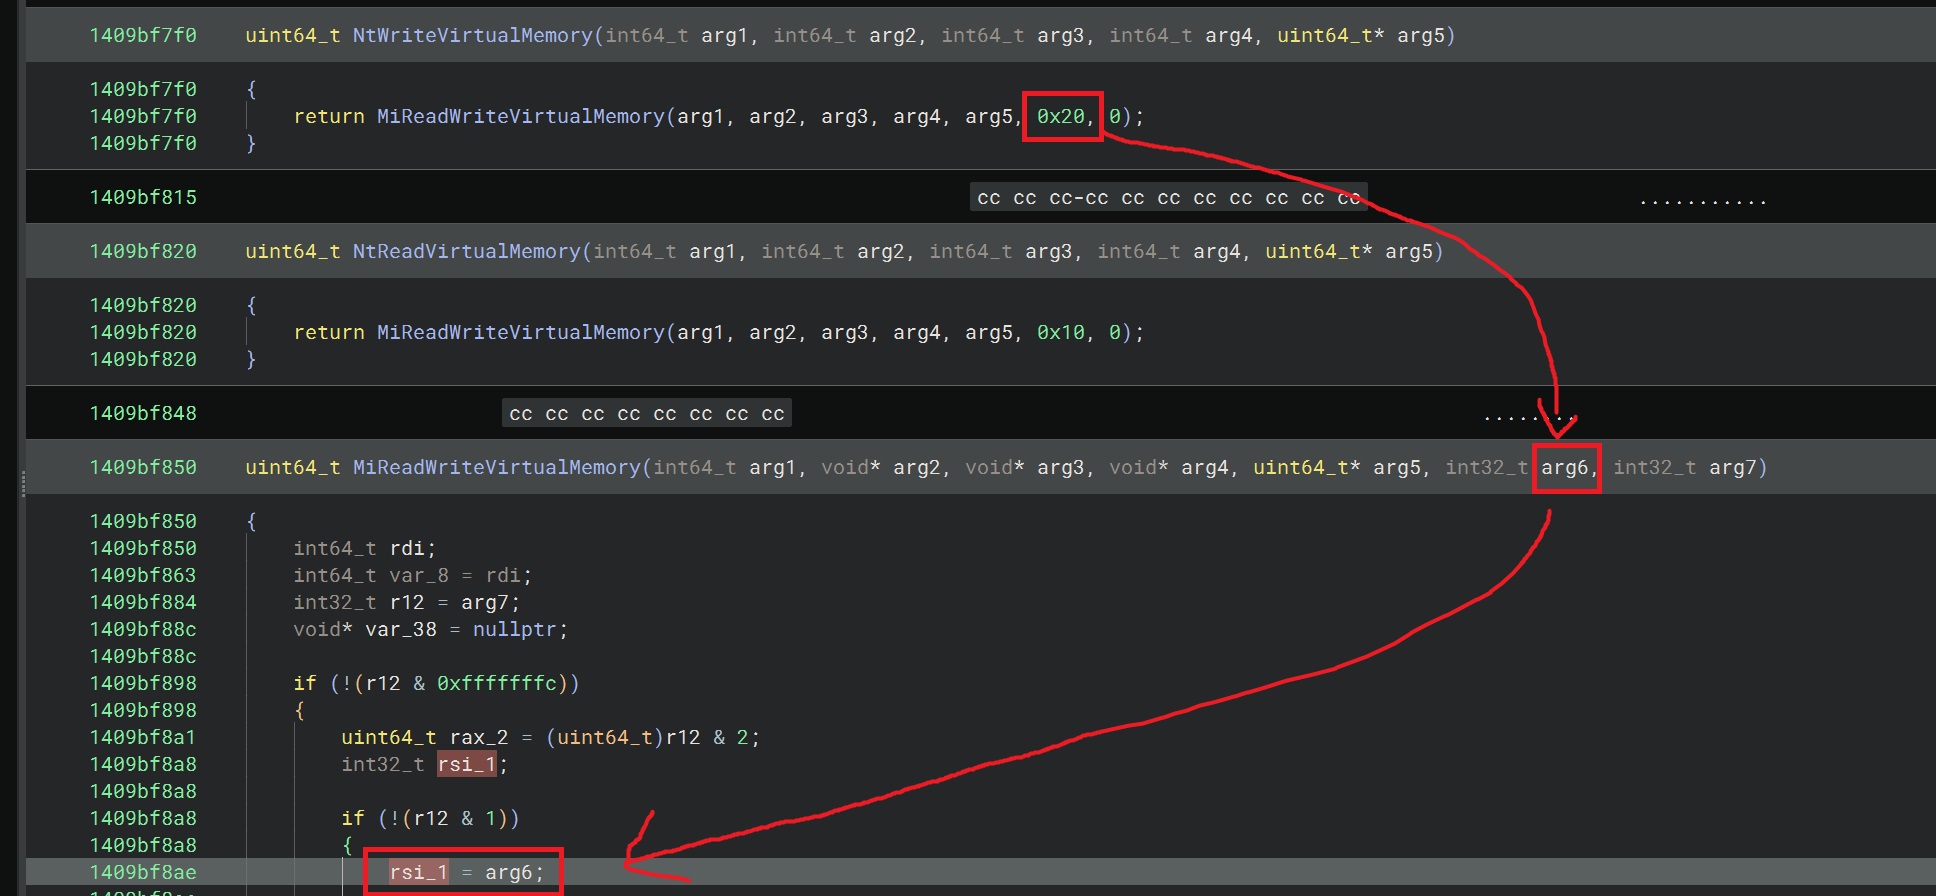
As you can see, this function makes a call into `MiReadWriteVirtualMemory` and pushes the value **0x20** and **0** onto the stack, which become the 6th and 7th parameters of the `MiReadWriteVirtualMemory` function call.
|
||
|
||
`MiReadWriteVirtualMemory` is an **undocumented kernel function** which means we cannot just look up the arguments on the Microsoft docs; time to get our hands dirty!
|
||
|
||
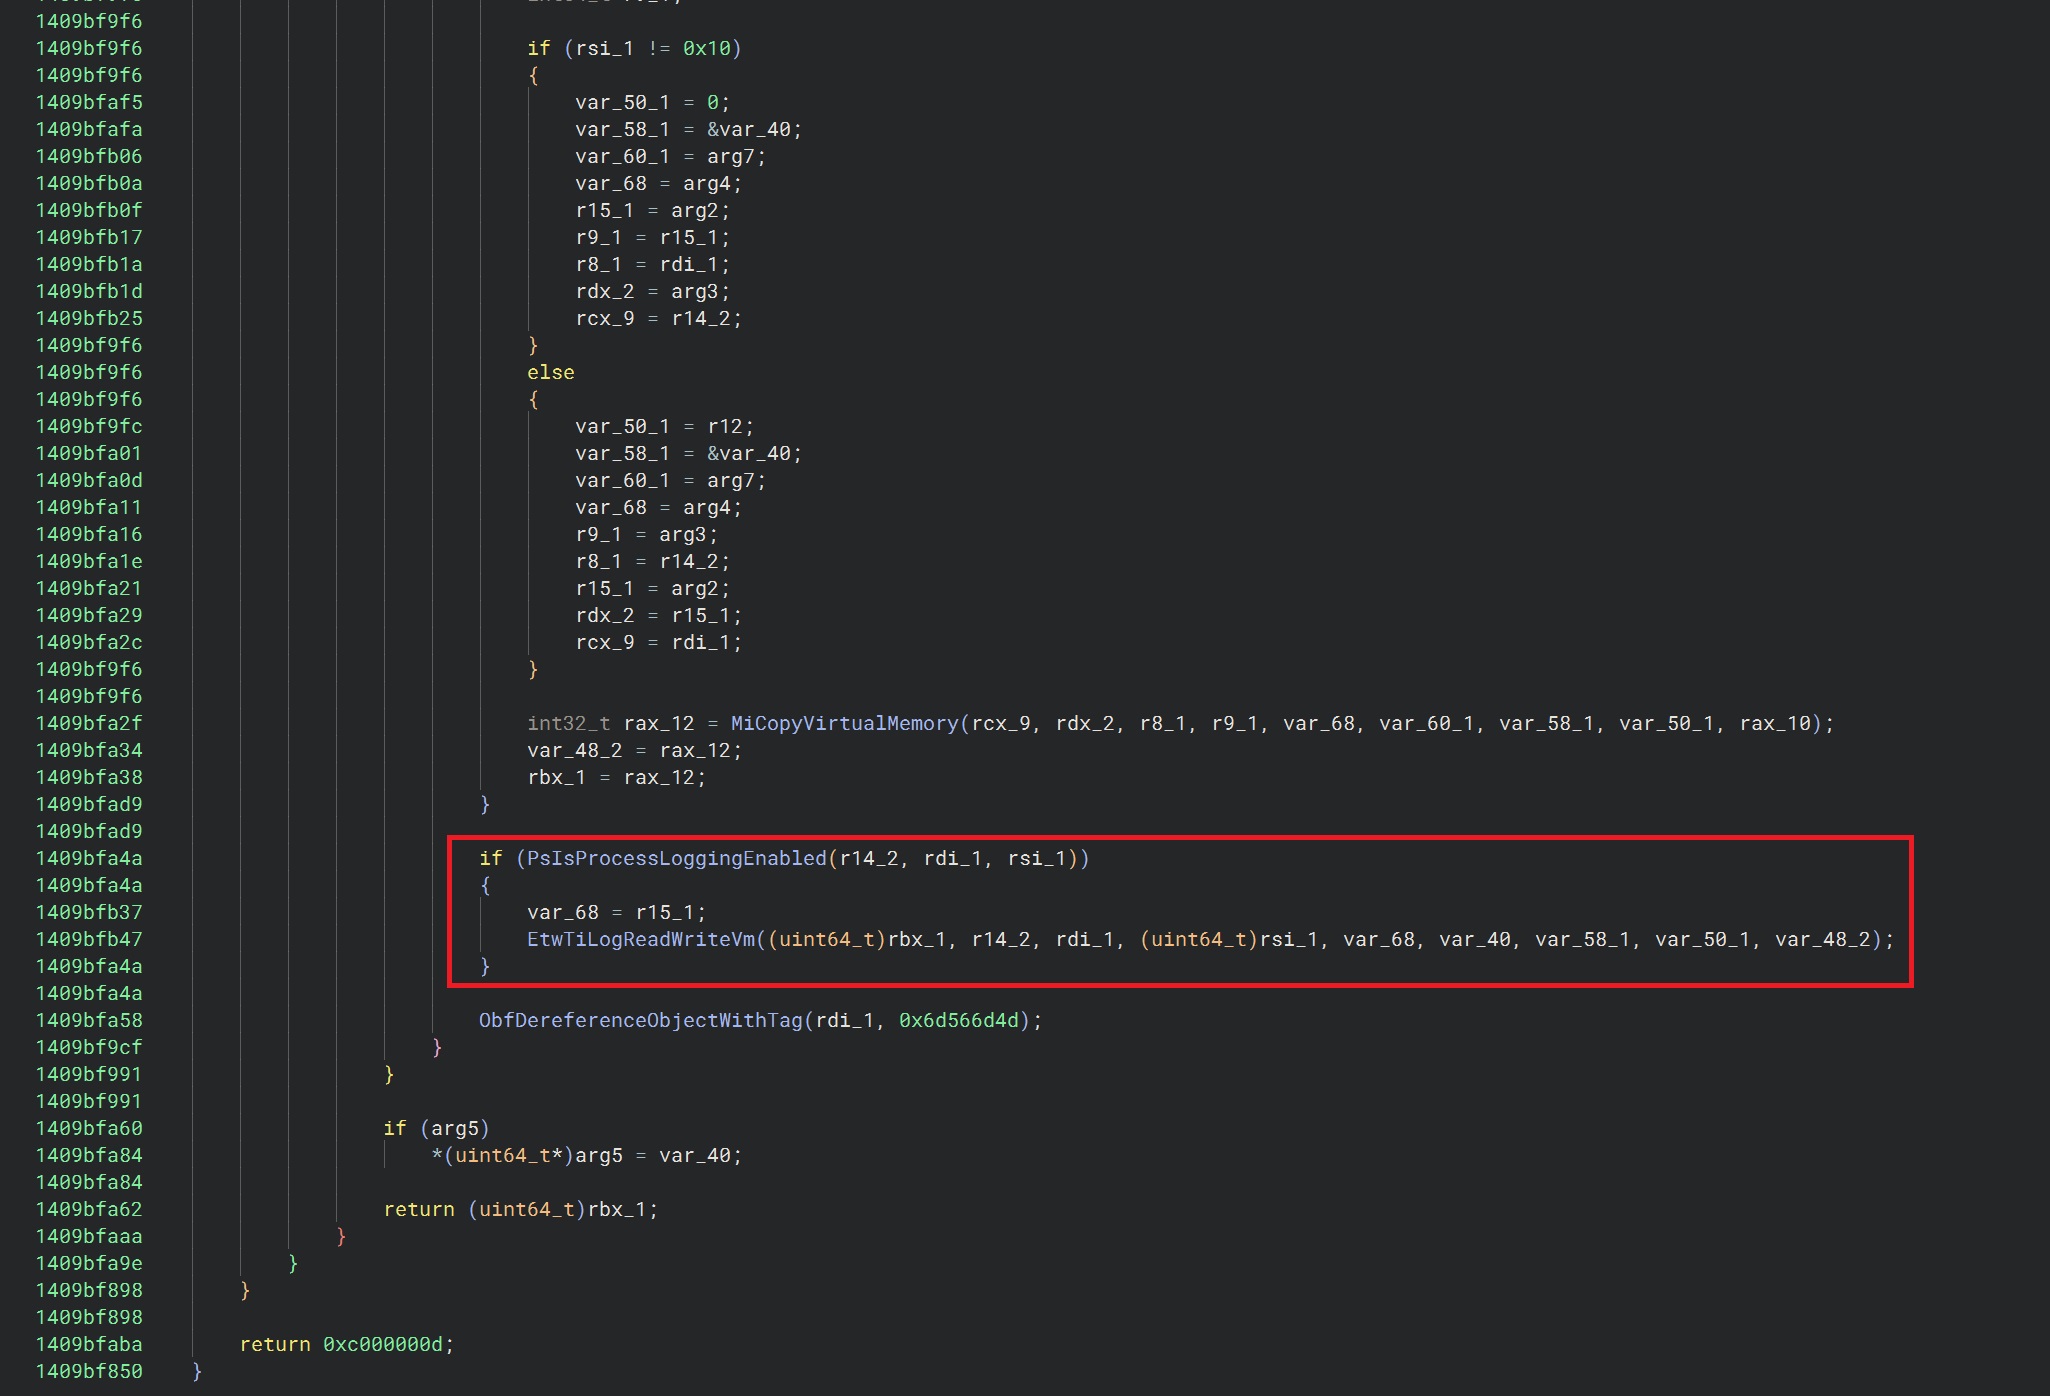
First step is a quick scan with our eyes of the function (in **Pseudo C** mode so we aren’t trying to make sense of assembly just from scanning the function) to get a feel of its flow, and any key internal API calls it makes. Two things jumps out straight away near the bottom of the function, a check of the function `PsIsProcessLoggingEnabled` and then a call to `EtwTiLogReadWriteVm`.
|
||
|
||
|
||
|
||
Hmmm, maybe this is our problem? Maybe we are failing this check? Lets continue reversing this and see where we get to. Ideally, we want to know what parameters are being passed into these functions so we can see if we are causing any errors or state mismatch in our code.
|
||
|
||
Some of this is trivial; and we can do easily in the **Pseudo C** mode to make fast headway, for example matching variables to inputs (we know what [NtWriteVirtualMemory](http://undocumented.ntinternals.net/index.html?page=UserMode%2FUndocumented%20Functions%2FMemory%20Management%2FVirtual%20Memory%2FNtWriteVirtualMemory.html) takes in) thanks to ntinternals, we also know that we push stack arguments into the function in the caller into `MiReadWriteVirtualMemory` as per my screenshot above. Using this information, we can assert that the right most argument passed into `PsIsProcessLoggingEnabled` and also into `EtwTiLogReadWriteVm` (**rsi**) is the 6th argument in the function, which we know is **0x20**. And we can now repeat this until we reach a point where we need to start looking at the assembly to make further sense of the function.
|
||
|
||
|
||
|
||
After rinsing and repeating, we get to the stage where we need to make sense of the variable **r14\_2** which is passed into both functions.
|
||
|
||

|
||
|
||
To be honest, this isn’t **too** bad, but there are times when you are looking at some of the Pseudo C and you cant quite make heads or tails of what it’s showing you. At this point, I find its good to switch over to the disassembly view and take a more detailed look.
|
||
|
||
So, looking at this in assembly we can see it is dereferencing whatever is in **r14** offset with hex **b8** and storing that back in r14.
|
||
|
||

|
||
|
||
Scrolling up to see what is in **r14** in the first place, we find that it is storing whatever is at **gs:0x188** - and this is the address of where the **CurrentThread** information is stored, which is a [KTHREAD](https://www.vergiliusproject.com/kernels/x64/windows-11/24h2/_KTHREAD). How do we know this? Well, you can use the vergiliusproject to traverse from **GS** > **Prcb** (offset 0x180) > **CurrentThread** (offset 0x8).
|
||
|
||

|
||
|
||
So, what exactly is **0xb8** from the **CurrentThread**? Doing a ctrl+f for this value on vergiliusproject gives us nothing. Thats ok! Lets have a look at what is the last struct before offset **b8** within the KTHREAD:
|
||
|
||
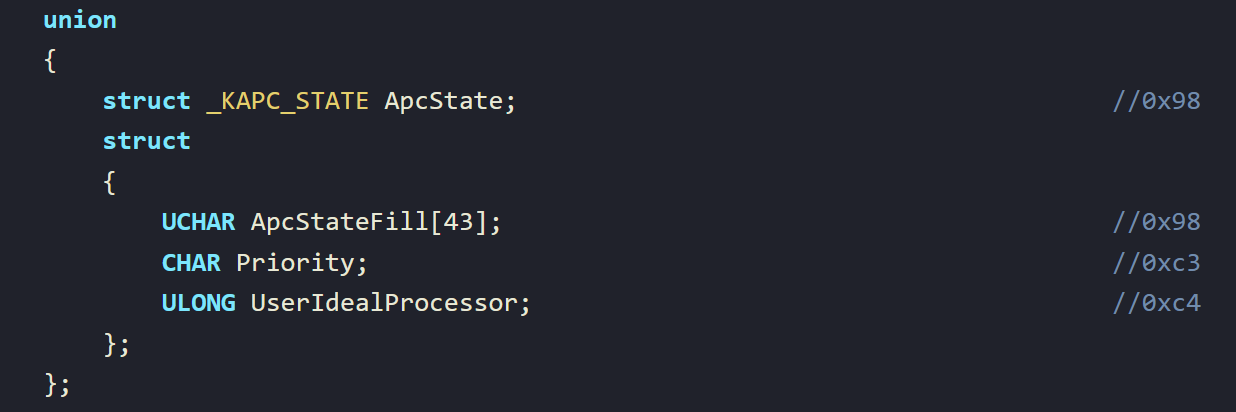
|
||
|
||
You can see we have [\_KAPC\_STATE](https://www.vergiliusproject.com/kernels/x64/windows-11/24h2/_KAPC_STATE) at **0x0x98**. Looking in there we have a few structs with offsets, doing some math we can do **B8 - 98** which is equal to **0x20**. As it happens, there is a pointer within this \_KAPC\_STATE at offset **0x20**, which is `struct _KPROCESS* Process;`
|
||
|
||
We can therefore conclude, that the argument we are investigating is a pointer to the KPROCESS.
|
||
|
||
From reversing the function we can also see a call to another undocumented function, `ObpReferenceObjectByHandleWithTag`, which is functionally identical as far as I can see to [ObReferenceObjectByHandleWithTag](https://learn.microsoft.com/en-us/windows-hardware/drivers/ddi/wdm/nf-wdm-obreferenceobjectbyhandlewithtag). This helps us map out other variable names in our decompilation.
|
||
|
||
So, after spending a little time reversing this undocumented kernel function, I arrived at:
|
||
|
||
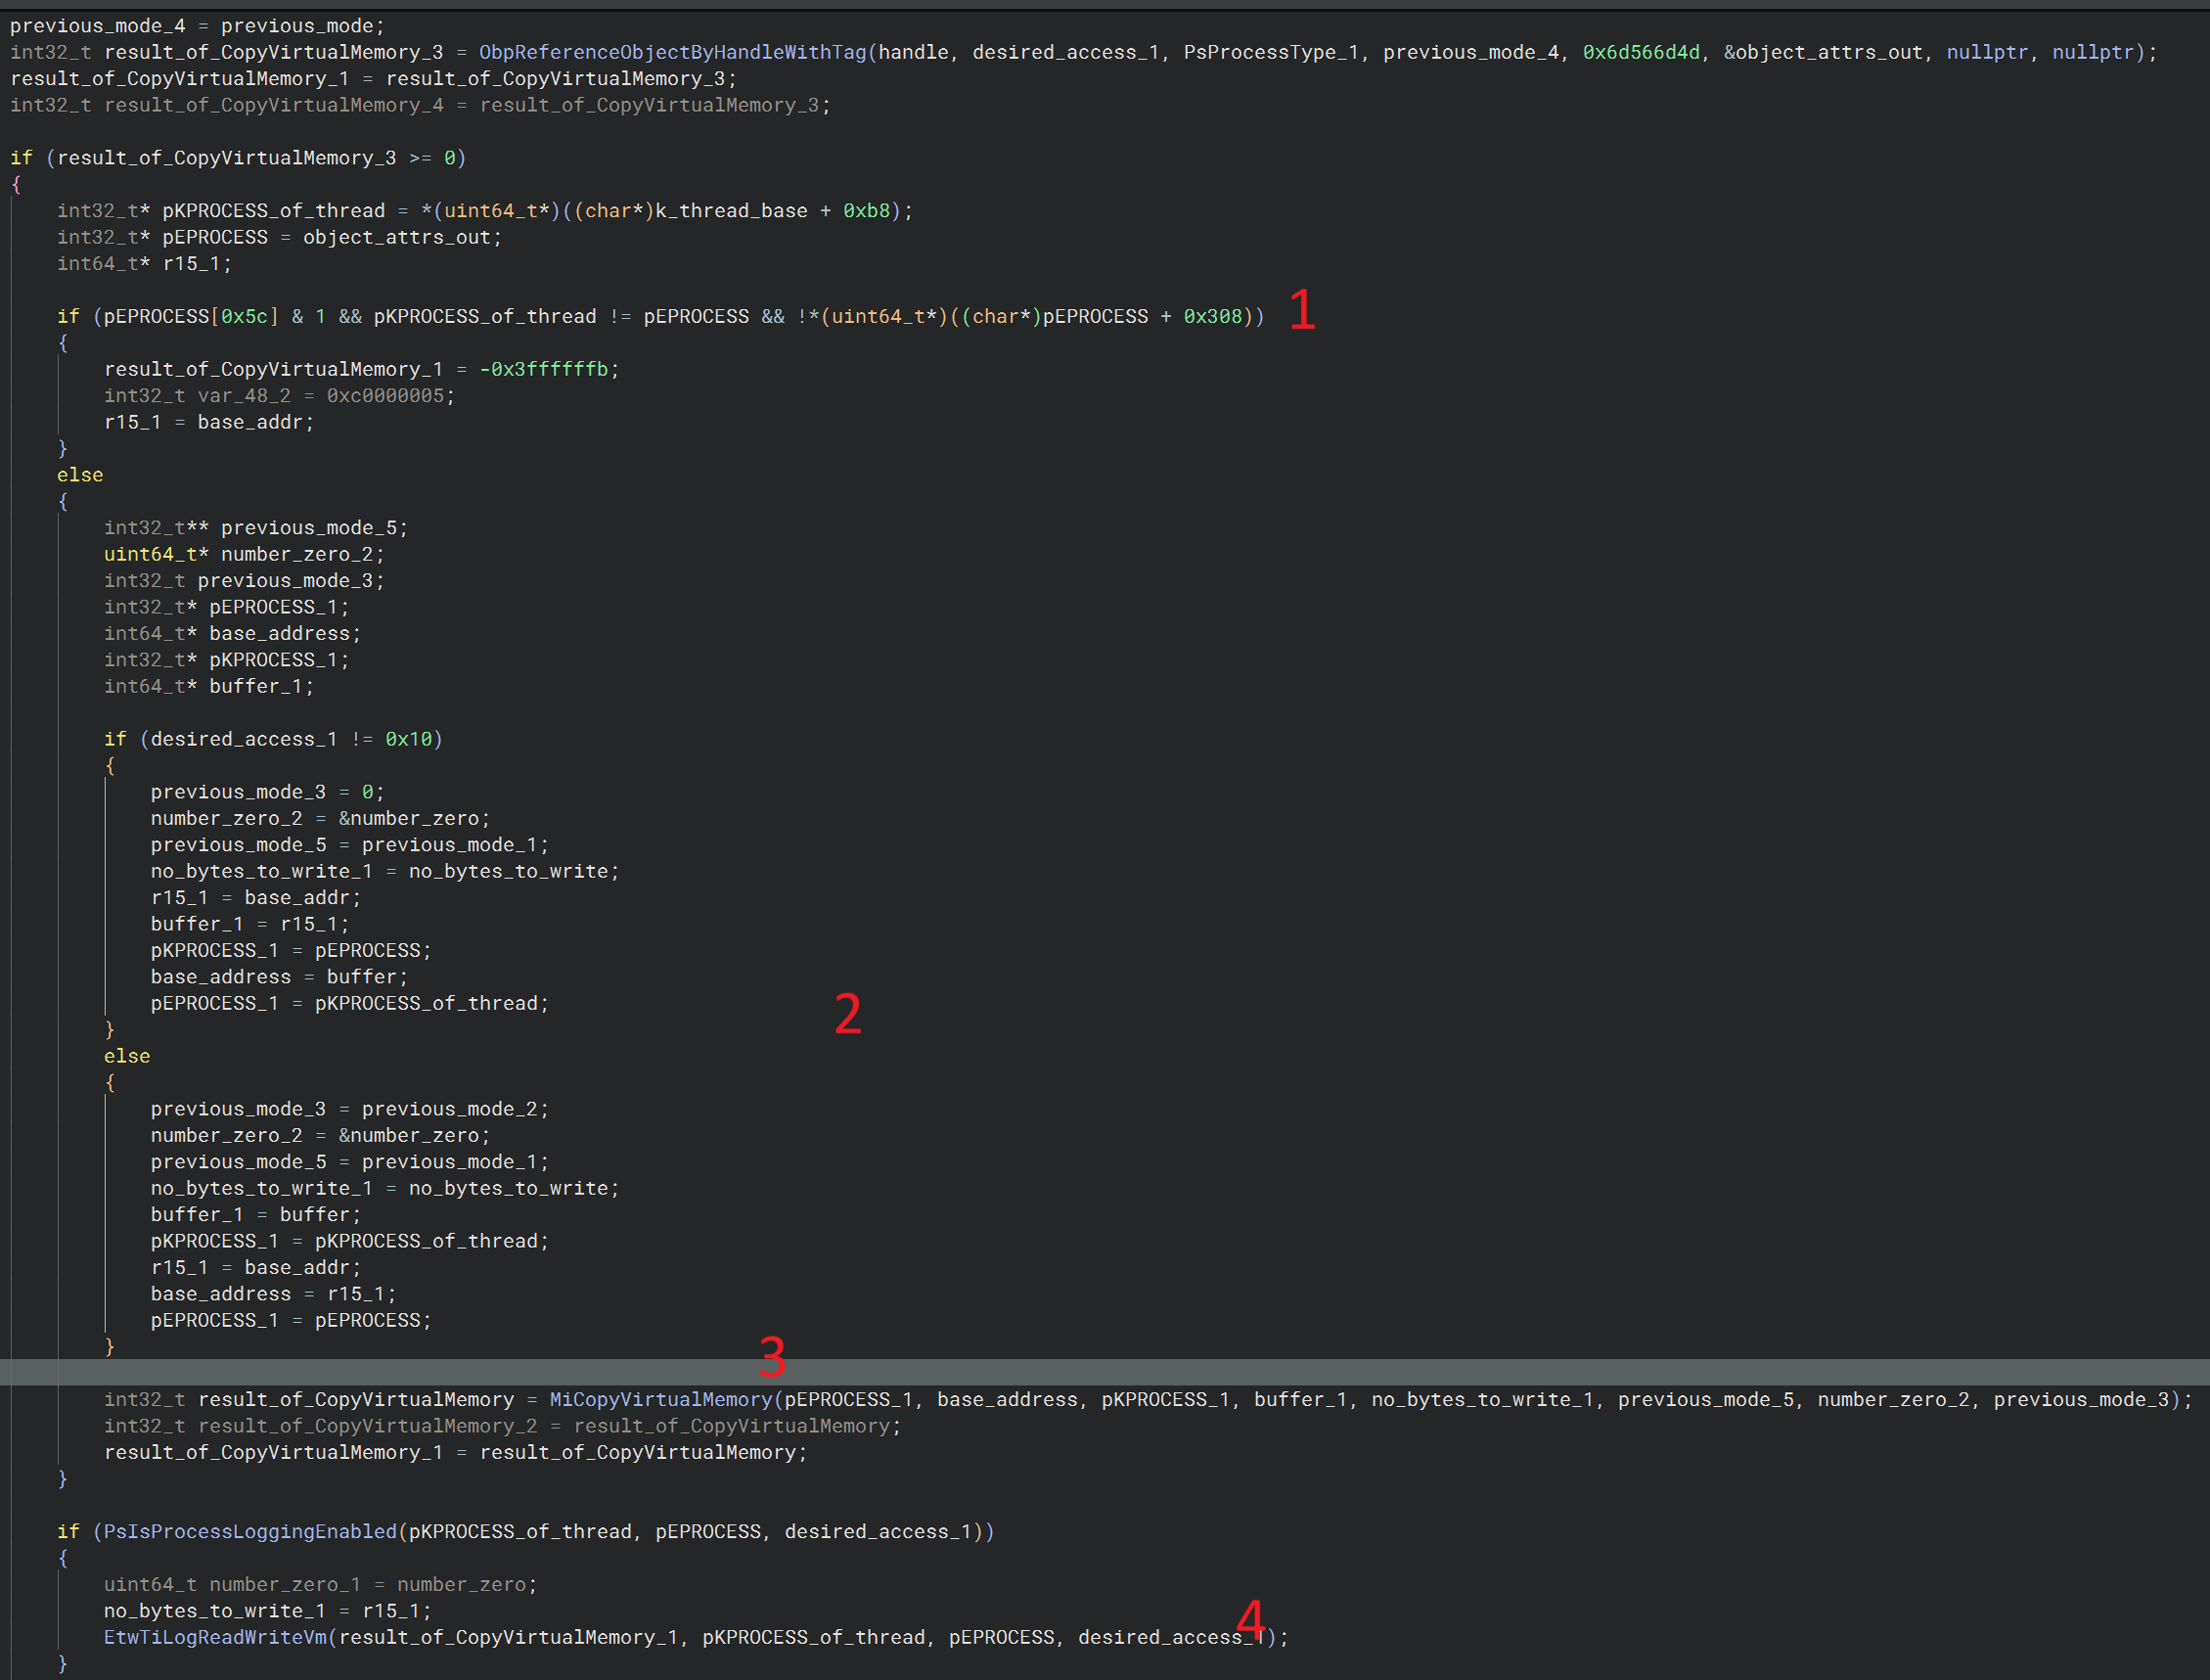
|
||
|
||
1. The function first checks that we aren’t attempting to write memory to a remote process which has certain flags set (seems to be a debug flag and some form of tree? I’m not entirely sure on the **0x5c**, it looks like some kind of BTree?). **Note** that with this check, its checking the LOCAL KPROCESS value against the EPROCESS we got from the handle input to the function, a smart way to see if its a local memory write or a remote memory write.
|
||
2. If the above check is okay, check the access rights and set the stage for performing the memory write / copy.
|
||
3. Perform the copy.
|
||
4. Check if logging is enabled, if so, send a signal to ETW.
|
||
|
||
Interestingly `EtwTiLogReadWriteVm` only has one reference - so clearly there is something special about this function.
|
||
|
||
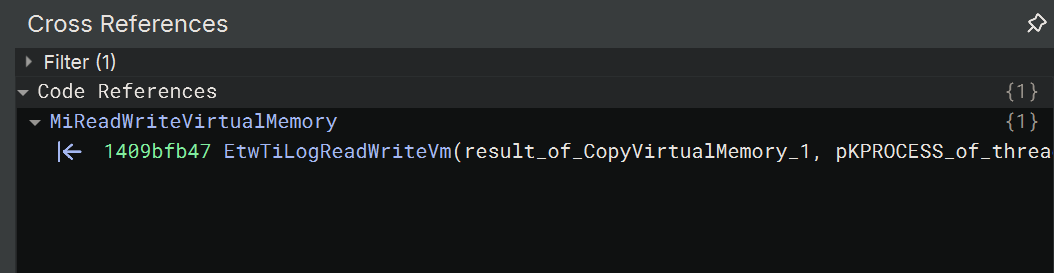
|
||
|
||
## Reverse engineering PsIsProcessLoggingEnabled
|
||
|
||
So, we now know what variables are passed into `PsIsProcessLoggingEnabled`:
|
||
|
||
1. The KPROCESS (equivalent to the EPROCESS) of the current thread
|
||
2. The EPROCESS of the target of the memory write
|
||
3. Desired access rights
|
||
|
||
Taking a look inside of `PsIsProcessLoggingEnabled` we can see (after I’ve mapped the access rights via comments):
|
||
|
||
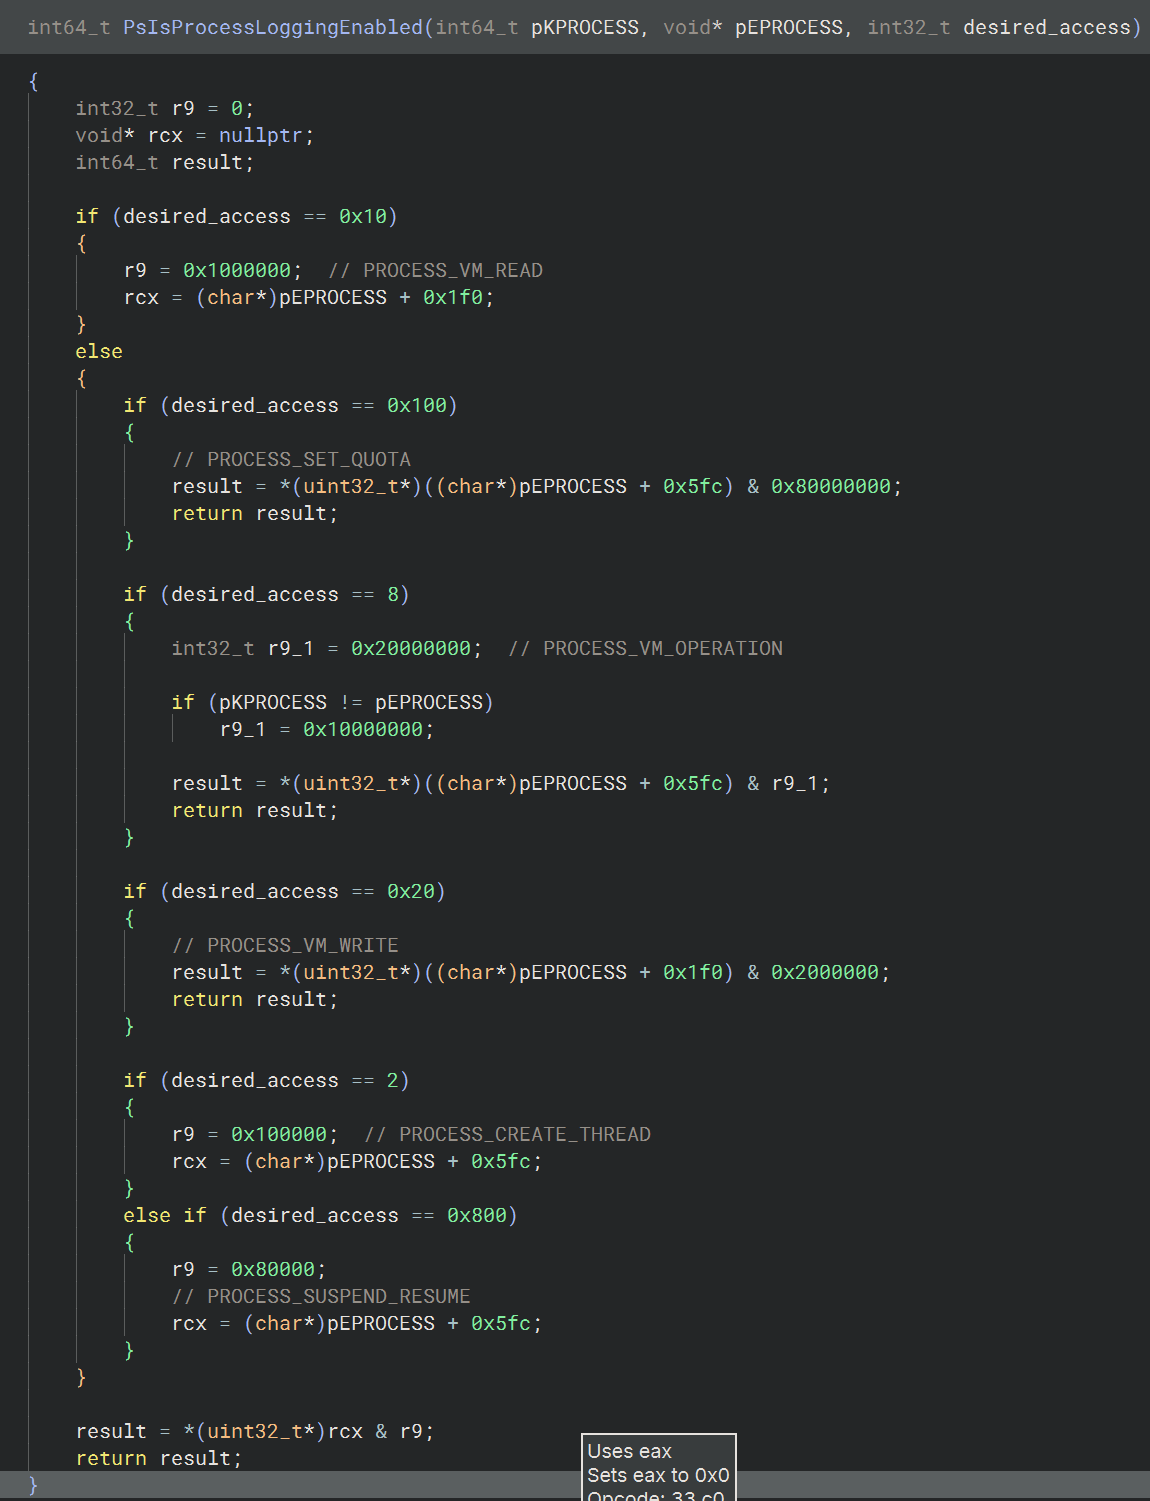
|
||
|
||
You can see the return value is dependant upon the result of **rcx & r9**, where r9 is a mask, and rcx is ‘something’. So, what is this something? Back to the basics we talked about in the introduction, it is offset **0x1f0** from the EPROCESS, which is this struct:
|
||
|
||
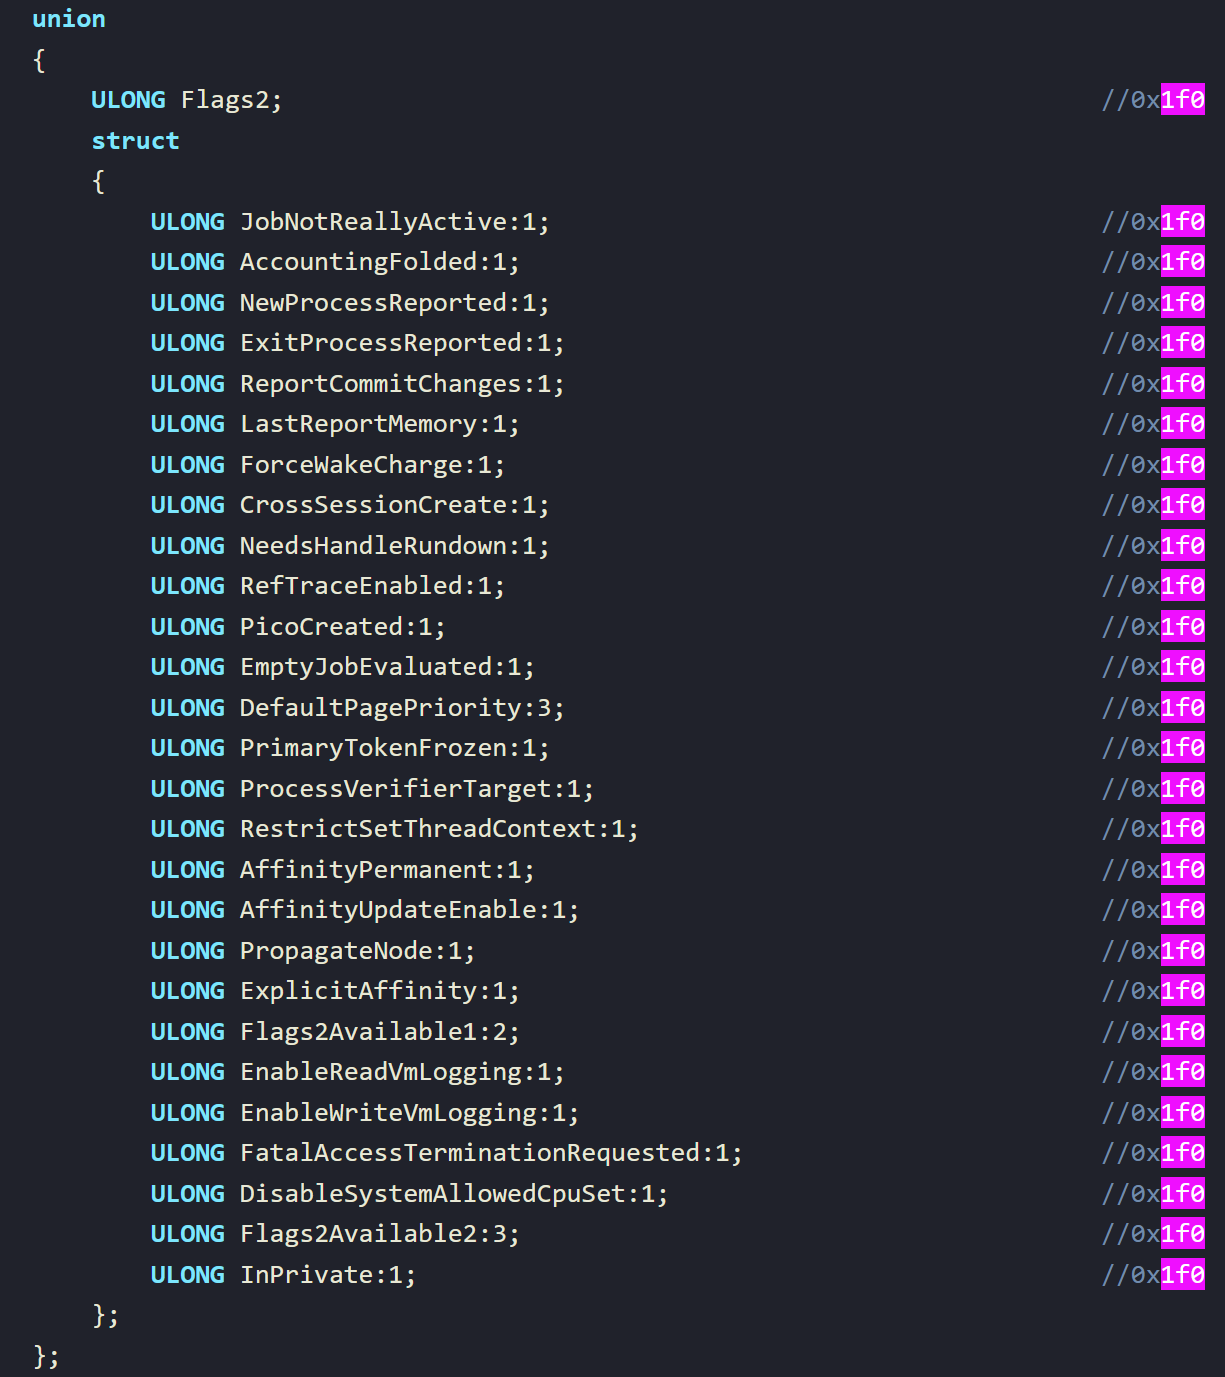
|
||
|
||
And in there, we have two bit flags for: `EnableReadVmLogging` and `EnableWriteVmLogging` - nice! It’s checking to see whether these are set! So, we need to examine whether these bits are set or not in the EPROCESS structure at runtime to see if this is the issue; or if its something else.
|
||
|
||
## Reverse engineering EtwTiLogReadWriteVm
|
||
|
||
Before we talk about debugging this, lets quickly have a look inside of `EtwTiLogReadWriteVm` to see what it’s doing - again, we can just use Pseudo C to keep things simple. It’s quite a long function, but looking immediately at the beginning we see:
|
||
|
||
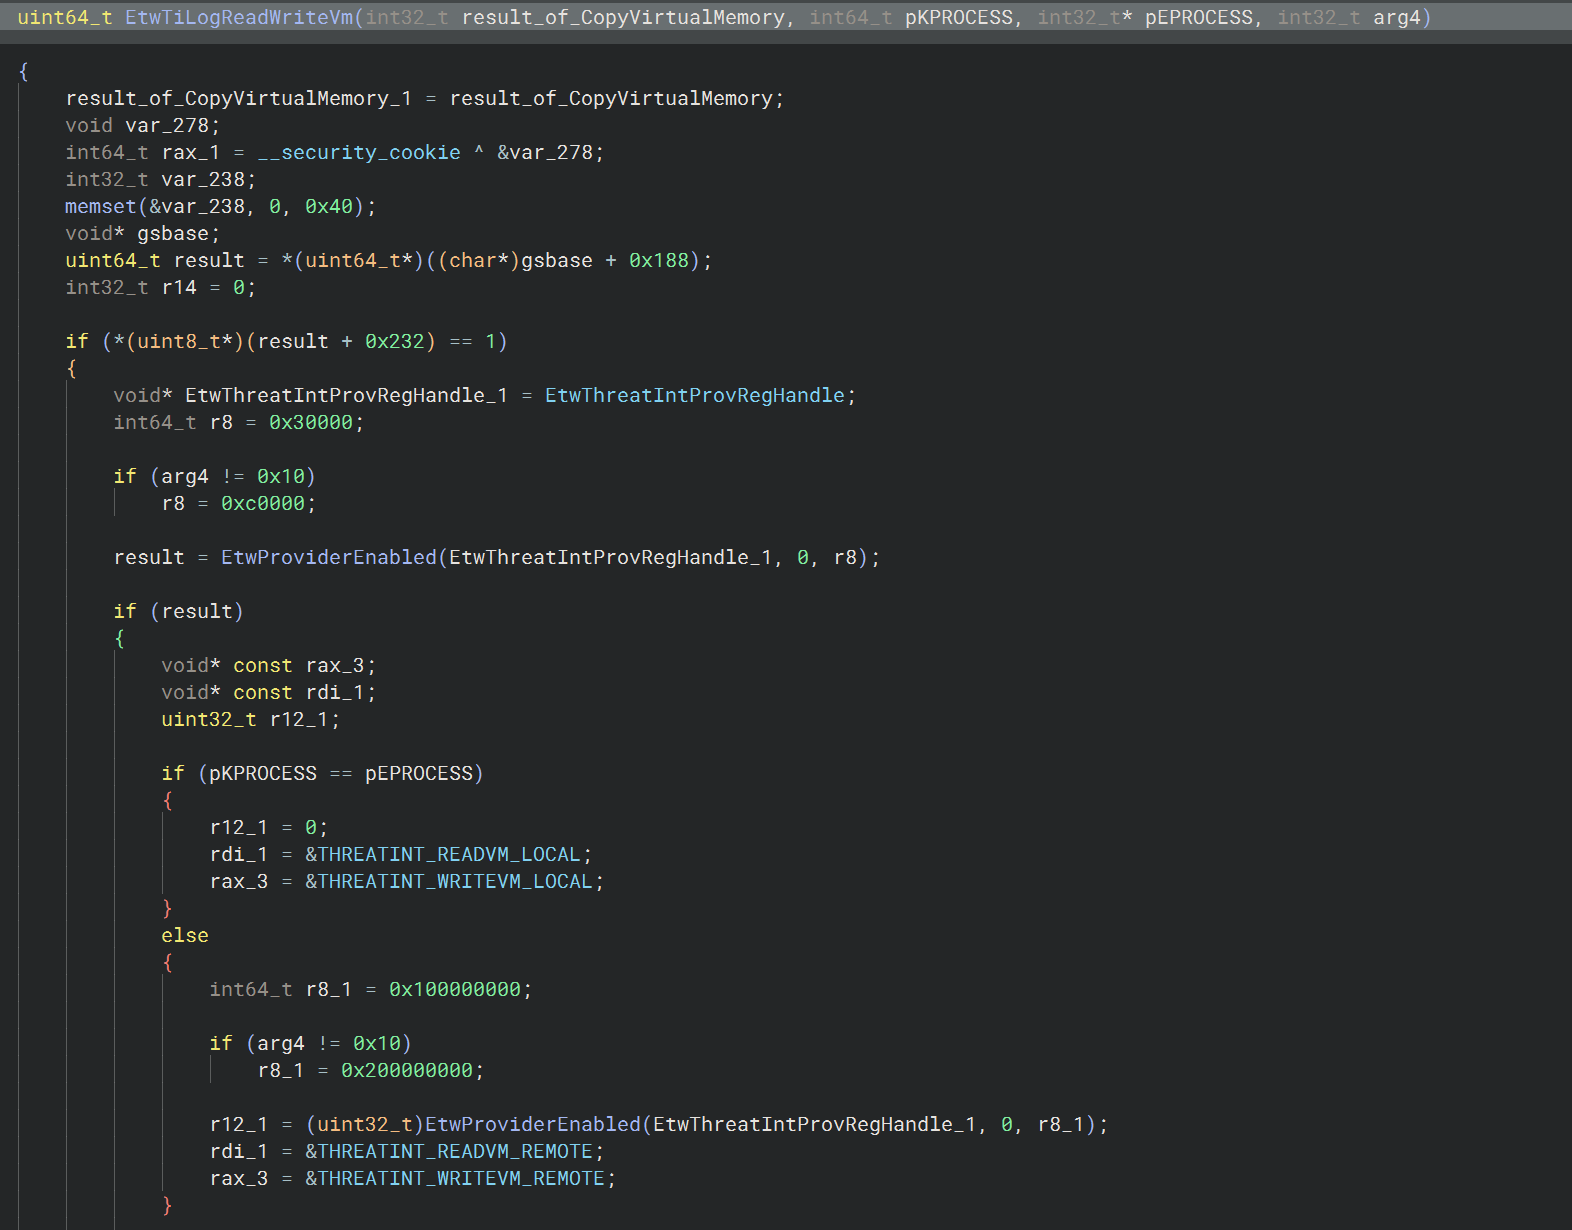
|
||
|
||
And we can see a check for local or remote process memory operations, similar to earlier where it checks the thread KPROCESS vs the EPROCESS resolved via the handle of the operation. You can then see some flags being set for example: **THREATINT\_WRITEVM\_REMOTE**.
|
||
|
||
Going back to the beginning, this corresponds (at least in principal) to the bitmask for our ETW:TI consumer:
|
||
|
||
```rust
|
||
const KERNEL_THREATINT_KEYWORD_WRITEVM_REMOTE: u64 = 0x80000;
|
||
```
|
||
|
||
So, we are on the right track.
|
||
|
||
## Kernel debugging
|
||
|
||
The next step, is to debug the kernel to check whether these flags are set or not. There’s a few ways to do this; but I’ll show the most simple route, which is setting a breakpoint where we check the flag and seeing what the value is.
|
||
|
||
I’m going to skip a tutorial on setting up a debugger etc, but I have somewhat described the process [here](https://fluxsec.red/rust-windows-driver). There’s plenty of tutorials on the internet for doing this if you are unfamiliar, so go check those.
|
||
|
||
Ok - so we have started the VM with the kernel debugger attached. First things first, lets break the debugger and do a lookup for the function `PsIsProcessLoggingEnabled` with `uf nt!PsIsProcessLoggingEnabled`.
|
||
|
||
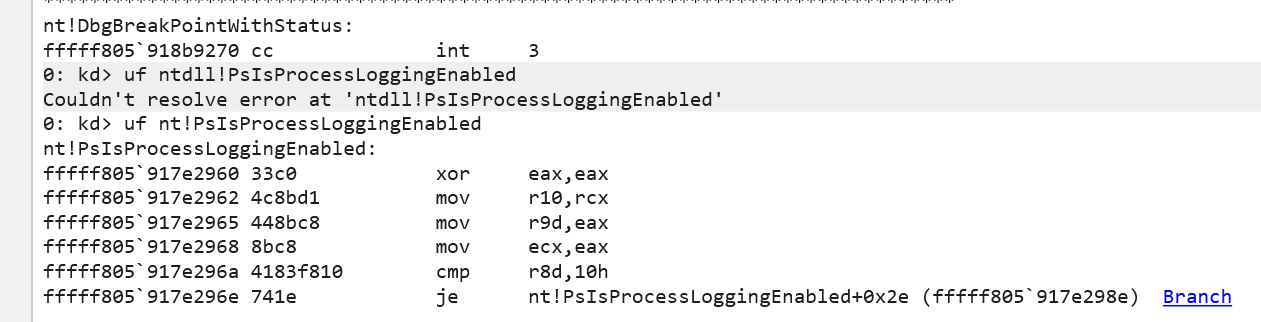
|
||
|
||
This gives us the address of the function (fffff805\`917e2960), that we can then lookup in the Disassembly view (1).
|
||
|
||
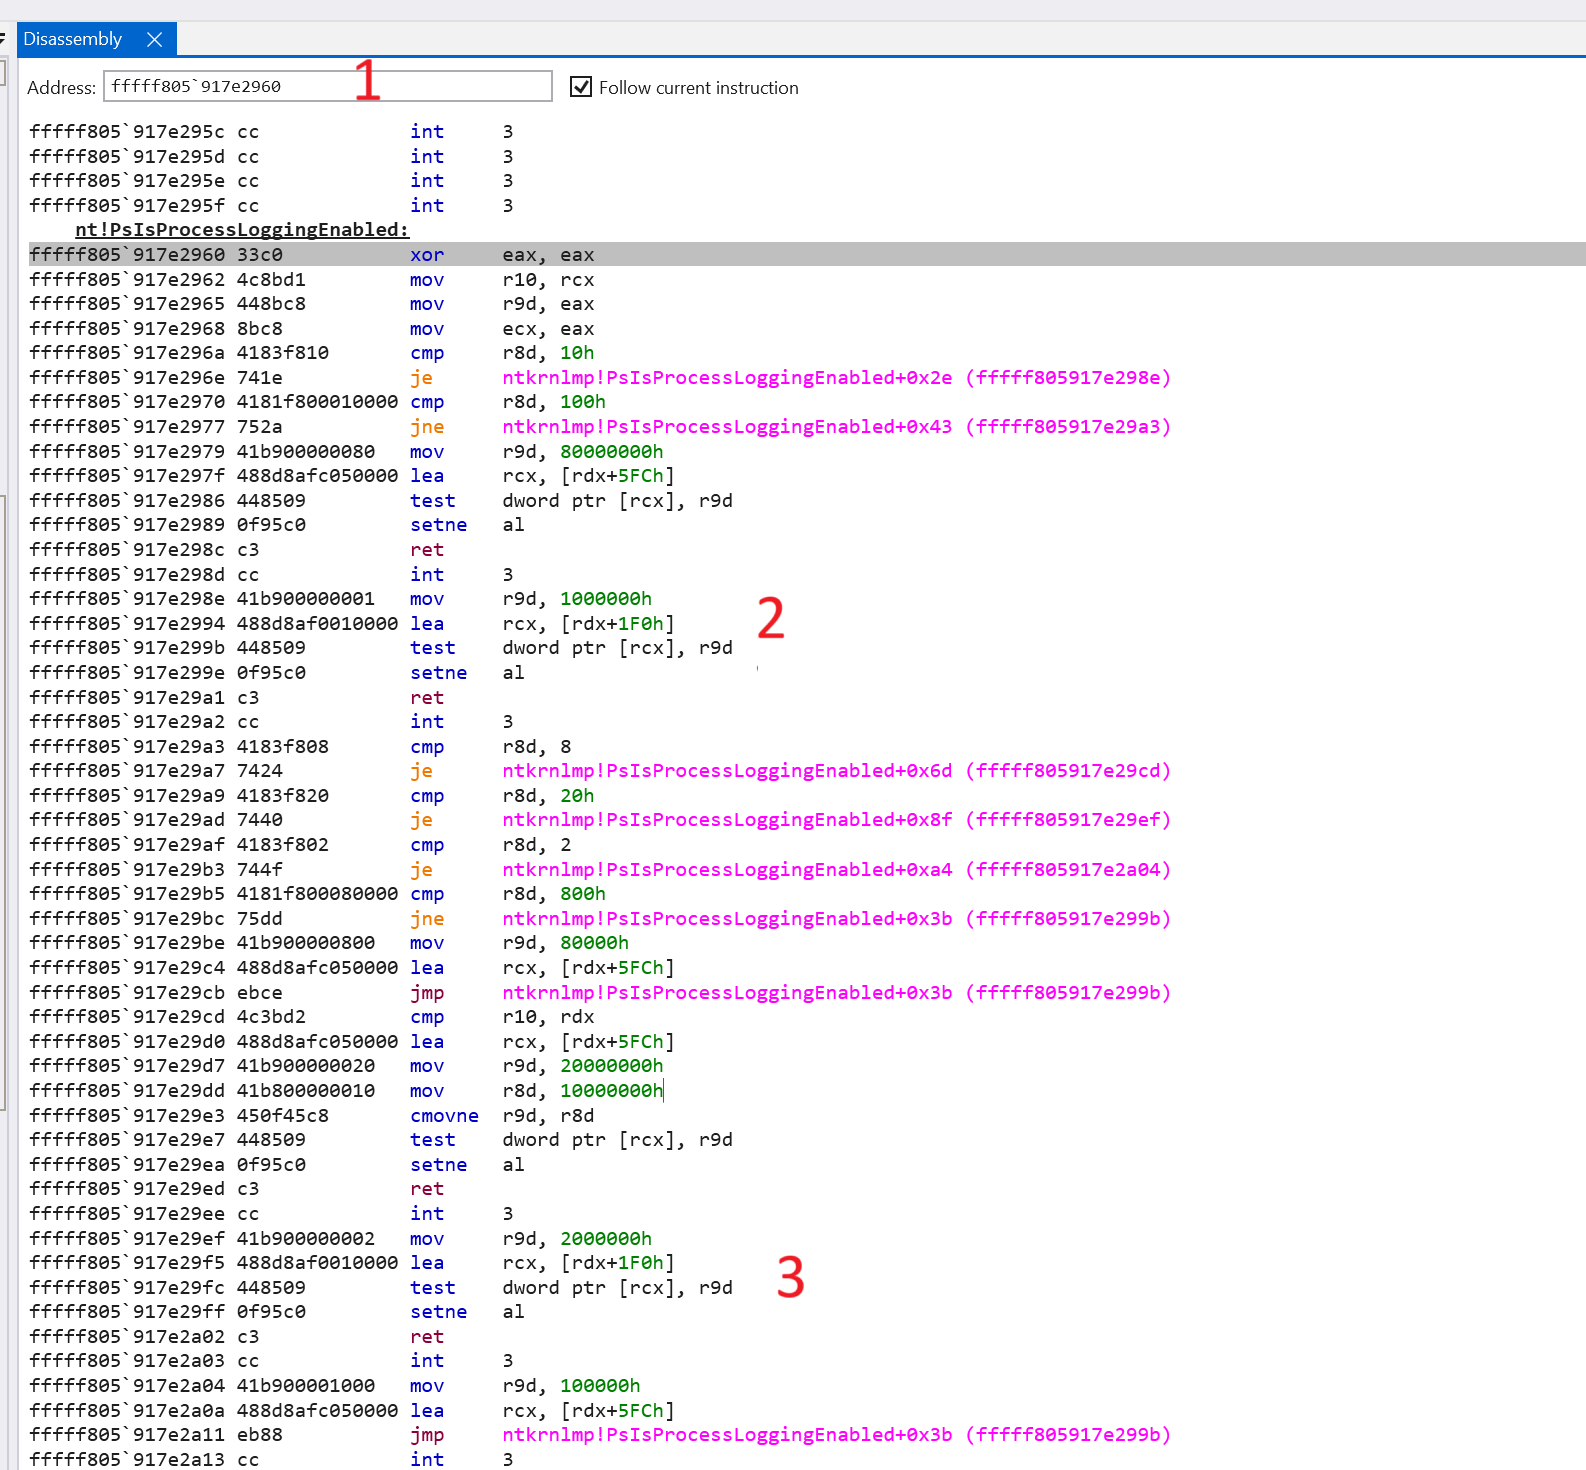
|
||
|
||
And looking down the assembly, we can see (2, 3) the **test** instruction which compares the bitmask (logical AND). Be careful not to mistake these checks with those against **\[rdx+5FCh\]**. Compare this to the above decompilation if you want to try make sense of it.
|
||
|
||
These branches equate to the decompilation we saw above, so rather than setting a breakpoint in one specific branch, we can just set a breakpoint at the start of the function, and look at what bits are set at **\[rdx+1F0h\]** to see whether that corresponds to the mask for `EnableReadVmLogging` or `EnableWriteVmLogging`.
|
||
|
||
So, we can set a breakpoint on this with **bp fffff805\`917e2960** on entry to the function, and resume the debugger and wait for it to break.
|
||
|
||

|
||
|
||
Now a thread has broke on our breakpoint, and we can use the **r** command to view the register state. Remember the Windows calling convention says:
|
||
|
||
1. Arg 1 = RCX
|
||
2. Arg 2 = RDX
|
||
3. Arg 3 = r8
|
||
4. Arg 4 = r9
|
||
5. Arg 5 onwards = stack
|
||
|
||
And remember, we need to see what is inside of **rdx+1F0h**, based on the earlier reverse engineering - we know this is the EPROCESS of the process we are targeting with the memory operation, NOT the KPROCESS (aka EPROCESS) of the current thread (AKA the current process).
|
||
|
||
Counting the bits of the ULONG (32 bits), for EnableReadVmLogging and EnableWriteVmLogging, we are looking to see if bits 24 and 25 are set. To do this, we can save the DWORD into a temporary variable in the debugger and do some bit field manipulation to print the result out as follows:
|
||
|
||
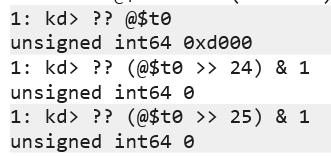
|
||
|
||
As we can see, the bits are not set! If we step through this in the debugger, after returning from the function `PsIsProcessLoggingEnabled`, we do a **test eax, eax** followed by a **jne** - the address of the **jne** will branch us to then making the ETW call - thus, from stepping through this, we confirm the hypothesis that the bits are not set. The below image shows us having stepped over the **jne** instruction.
|
||
|
||

|
||
|
||
## Setting the bits
|
||
|
||
Altering the values in the EPROCESS can be done with the functions ZwSetInformationProcess / [NtSetInformationProcess](http://undocumented.ntinternals.net/index.html?page=UserMode%2FUndocumented%20Functions%2FNT%20Objects%2FProcess%2FNtSetInformationProcess.html). To do this, we need to know what **PROCESS\_INFORMATION\_CLASS** to use. Only a few of these are [documented officially](https://learn.microsoft.com/en-us/windows/win32/api/processthreadsapi/ne-processthreadsapi-process_information_class), but thanks to the amazing Windows Internals researchers out there, [ntdoc](https://github.com/m417z/ntdoc/blob/main/descriptions/processinfoclass.md) has us covered.
|
||
|
||
A quick google of “EnableWriteVmLogging” brings us to: [PROCESS\_READWRITEVM\_LOGGING\_INFORMATION](https://learn.microsoft.com/en-us/previous-versions/mt826264\(v=vs.85\)), looking this up on the ntdoc, and we can see a value of 87.
|
||
|
||
Nice!
|
||
|
||
The MSDN for PROCESS\_READWRITEVM\_LOGGING\_INFORMATION tells us this is 8 bits wide, and the lowest 2 bits equate to `EnableReadVmLogging` and `EnableWriteVmLogging`. So, we would want a mask of 0x3, or 00000011.
|
||
|
||
So, armed with this we are ready to go.
|
||
|
||
When calling the Nt\* version of this function, I got STATUS\_ACCESS\_DENIED, whereas the Zw\* call worked fine. This is probably because it requires PreviousMode set to KernelMode.
|
||
|
||
As an aside, related to the Nt vs Zw, you will have noticed there are functions with the same name, but some have a Nt prefix, whereas others have a Zw. For example: **ZwSetInformationProcess** and **NtSetInformationProcess**.
|
||
|
||
Put simply, Nt\* is the actual system call implementation of the function, and the Zw\* is a kernel wrapper around the implementation which sets [PreviousMode](https://learn.microsoft.com/en-us/windows-hardware/drivers/kernel/previousmode) to KernelMode. Whilst we can directly call Nt functions from the kernel; if we do not have the correct PreviousMode we may encounter errors - such as in my case where I got STATUS\_ACCESS\_DENIED. This isn’t always the case and it is API dependant. Processes making a system call from usermode, will have the PreviousMode of **UserMode** set.
|
||
|
||
Taking a look at the Zw stub (this is the case afaik for all Zw stubs around an Nt function) we store the **System Service Number** of the Nt function in **rax**, which is then looked up after the PreviousMode is changed, for example:
|
||
|
||
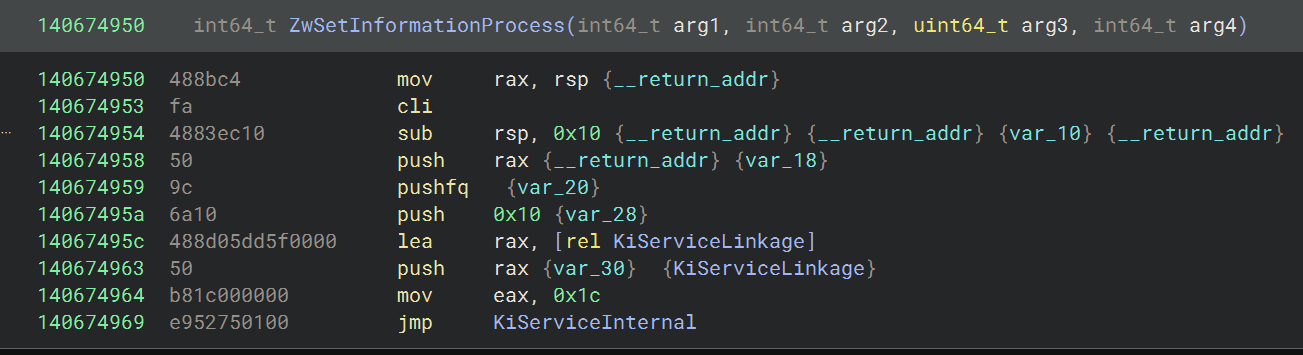
|
||
|
||
Transitioning to the Zw\* version of the function, and it behaves as expected.
|
||
|
||
As the **ZwSetInformationProcess** function isn’t available in the Windows Driver API, but it is available in the.text section of the kernel, we are able to define the function prototype, mark it as **unsafe extern “system”** and call it directly from our code, over the Foreign Function Interface. So, lets define the function prototype as per ntdocs:
|
||
|
||
```rust
|
||
extern "system" {
|
||
fn ZwSetInformationProcess(
|
||
ProcessHandle: HANDLE,
|
||
ProcessInformationClass: u32,
|
||
ProcessInformation: *mut c_void,
|
||
ProcessInformationLength: u32,
|
||
) -> NTSTATUS;
|
||
}
|
||
```
|
||
|
||
Now, we want to call this on all new processes which are launched after the driver is started. We can do this in our pre-process creation callback (blog post todo). What we want to pass in, as we found earlier, is the **PROCESS\_READWRITEVM\_LOGGING\_INFORMATION** 8 bit structure, setting the lower two bits to 1 (aka, 0x3). We also know that the PROCESS\_INFORMATION\_CLASS constant needs to be 87 (thanks to ntdoc).
|
||
|
||
This is as follows:
|
||
|
||
```rust
|
||
let mut logging_info = ProcessLoggingInformation { flags: 0x03 };
|
||
let result = unsafe { ZwSetInformationProcess(process_handle, 87, &mut logging_info as *mut _ as *mut _, size_of::<ProcessLoggingInformation>() as _)};
|
||
```
|
||
|
||
## Testing it
|
||
|
||
Finally, we can rebuild the driver, load it, and open our target process and take a look to see whether:
|
||
|
||
1. These bits are set; and
|
||
2. The ETW:TI branch is followed in the `MiReadWriteVirtualMemory` function.
|
||
|
||
TL;DR, it works!
|
||
|
||
To test this, lets set a breakpoint in the **jne** branch which makes the call to `EtwTiLogReadWriteVm` which is where we have been trying to get to the whole time; and turn the driver on. Viola, we now break as expected!
|
||
|
||

|
||
|
||
So, allowing this to execute and checking the Event Tracing for Windows: Threat Intelligence output now - we successfully capture the signal!
|
||
|
||

|
||
|
||
I hope you enjoyed this! If you like this, please give the repo a star on [GitHub](https://github.com/0xflux/Sanctum) as it does help keep me motivated:)
|